Sustainability
@ Royal Society Chemistry
5. Using Gutenberg WordPress Editor
5.1 Understanding Gutenberg
Gutenberg is the WordPress Block editor that appears once you go into edit a page, a post type (like news (posts), and resources and more). See the example image below to understand how to navigate towards Gutenberg.
Please note that even though some of the example pictures used in this section are from Commonwealth Chemistry’s WordPress Administrator Panel, the navigation through post types is exactly the same and the mechanics behind creating new content as well.)
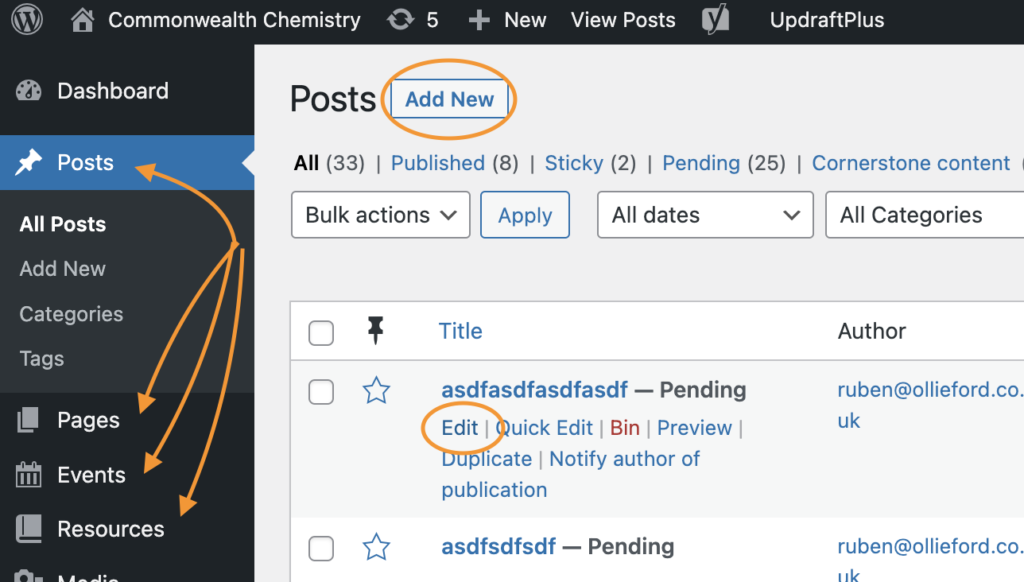
First, you must click on either Posts, Pages, or Resources to open the list of items that pertain to that certain post type. Once inside you can add a new item on Add New, near the top of the screen or go to a specific item and click on Edit.
Now, the fun part begins, you will be brought directly to Gutenberg, you surely will be prompted with a small window that offers to guide you through the editor, which would be a fantastic idea, nonetheless we would explain as well just for the sake of clarification.
The next example image has a lot of content but surely will guide you through the basics of Gutenberg.
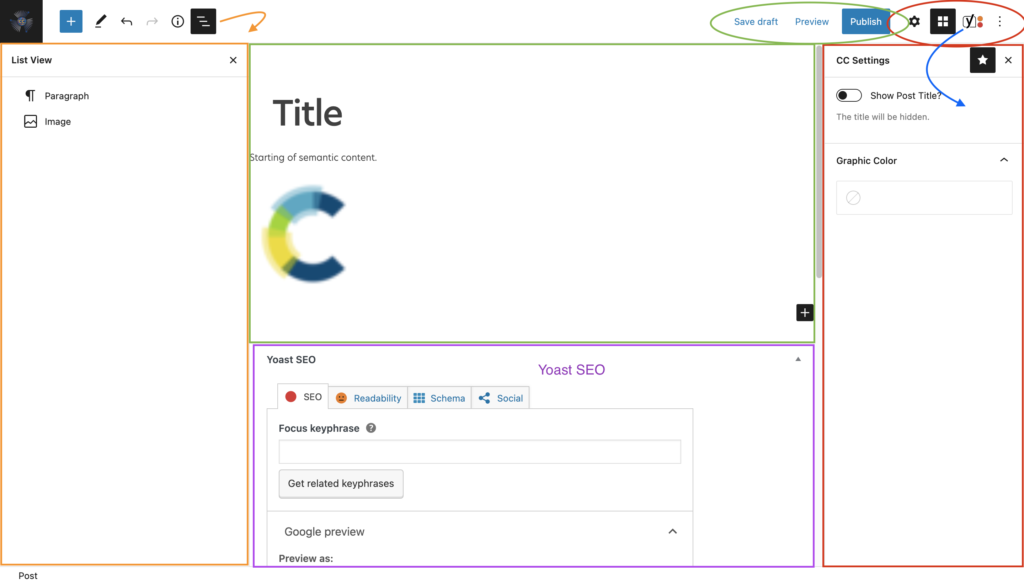
We will go through this by colour coding the image. On the left side and with the orange colour we have the list view, to toggle it on you just need to click on the three lines button where the orange arrow starts. This newly opened window on the left side is extremely useful as it shows you all the blocks in a list. You can best use it when you are not sure of the relationship between the blocks that you see on the content window (Green rectangle). The green circle shows you all the publishing or drafting options that are at the end of Section 3. Manage your Content. The Content Window is where you will see and edit all your progress on the post type you are editing. Under it, on purple you have the Yoast SEO generic form (instead of the bespoke Sidebar) which we have cover as well. Last but not least we have the Sidebar Area (on the Red rectangle) on the right hand side. As we have seen, here we will find the bespoke sidebars but also the Options and Settings sidebars.
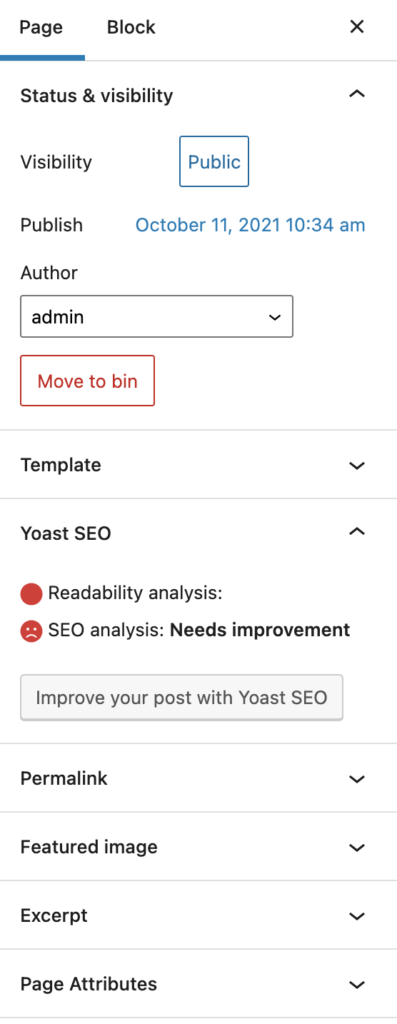
In order to access any of those two, you have the icons inside the red circle, a gear symbol for Settings, and the three vertical dots for Options. Options will show a sidebar where you can toggle on or off some features of Guttenberg. Settings, on the other hand has 2 different forms depending if you have selected a block or not. One of them is called Page, which will give you a list of options that generally affect the whole post and the other being called Block, this one will change depending on the type of Block you have selected and will only show options specific for that post. (see example images below)

5.1.1 Switching and accessing the buttons
While it might get a lot easier with practice, the first time you access WordPress can be daunting. That is why we have included example images throughout the guide in order to avoid confusion.
5.2 How to add blocks
There are two quick and easy ways to add Blocks to your page or post.
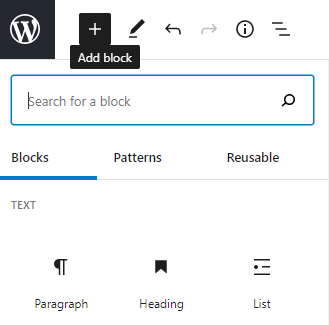
Option one – Toolbar “Add Block”
- Click the black + (Add) button on the top left WordPress toolbar (example image to the right side)
- Use the Search function or scroll down to view the different types of content Blocks available to insert – from headings & paragraphs through to images and video embeds.
- Click on the Block you wish to insert. It will automatically be added to the bottom of the page.
If you want more control over where you are inserting the Block, you can insert them directly into the area you are working on.
Option two – On-page “Add Block”
- Hover above or below an existing block with your cursor
- A black square + (Add) button will appear (example image to the left side)
- Click this and select the Block you wish to insert
- Your Chosen Block will be inserted into this space.
5.3 Editing Blocks
5.3.1 List View Functionality
Sometimes, it can be difficult to select the Block you want to edit because there are lots of Block elements in close proximity. It’s easy to select the wrong block, which is frustrating.
To sidetrack this issue, take advantage of the List View available in the top left hand side of the WordPress toolbar (as shown in the example image to the right side).
- Click the (List View) button with three horizontal lines.
- View all of the Blocks in your page or post in list view.
- Click on one of the Blocks to instantly edit.
- Click on the List View button again to see nested Blocks within Patterns or Layout Grids (as shown in the example below).

5.3.2 Block Settings
Clicking on the block you want to edit, or using the List View, will bring up Block Options & Settings.

(Example: Paragraph Block – clicking the block reveals the Options & Settings bar)
From here, you can (left to right):
- Change the Block style or type (e.g change a testimonial in a paragraph Block into the Quote Block)
- Drag and drop
- Move the block up or down
- Change the alignment
- Bold text
- Italicise text
- Add links
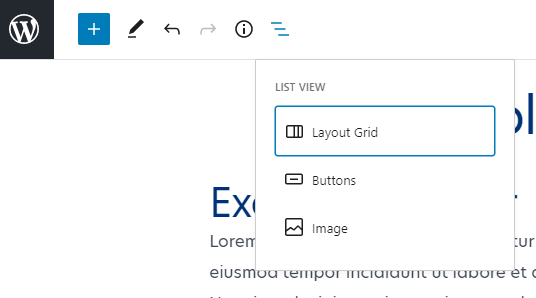
- The downwards arrow open a list of additional text functions (see in example image to the left side)
- The three dots open More Options where you can copy, duplicate, edit, delete or create a Reusable Block (more details in next section – Create Reusable Blocks)
5.3.3 Deleting a Block
Sometimes, you want to try a different layout, or you do not want the content you just created, in these occasions we have to delete the blocks you no longer want. The easiest way to delete a block is to select the block, locate the toolbar, go to the end of it, click on More options (three vertical dots) and at the end of the dropdown you should see Remove [Block name], so if you want to delete a paragraph, it should appear as Remove Paragraph.
If you have committed a mistake and want to go back in a specific step you can go to the back arrow on the top left side of Gutenberg.
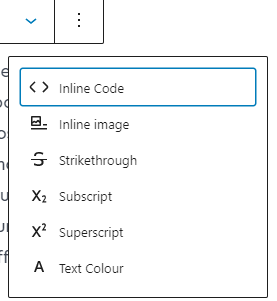
5.3.4 Sidebar
We refer with the term sidebar, to the editing options that appear when editing a page or a website. We can easily identify 3 different sidebars on the following example image below.
View is its own sidebar which let us toggle the information we see on the editor on and off. Next we have the options sidebar, which will only be in page with no blocks selected on the editor and if we select a block it will switch to block. Page options sidebar gives us the general options for the page, which you have already encountered, like template, featured image and such. Block options sidebar will show all the options available for the selected block.
5.3.5 Grouping Blocks
Grouping blocks together can have multiple uses, as we will cover some of them later on the User Guide, here we will guide you through how to block the groups together. For ease of understanding, I usually have the list view open. Then follow the next steps:
- Select on the list view the first block you want to be inside the group.
- Go to that block and on its toolbar, click on More Options (the three vertical dots), then select group.
- You will then see how the block appears on the list view as a child of the parent group, and you can see the relationship between the two through indentation.
- Now, you click and drag the second block you want to add within the list view. You can see an orange line that changes on length depending on where you are hovering with your mouse. This line, when shorter if placed inside the first block within the group, should indicate that if you drop the second block it will form part of the group as the second child. If you are not successful, you can try until you see the second block indented. if, for some reason, you misplace the block within the group, locate the block on the content window and use the up and down arrows in the toolbar, or use the method of drag and drop in the list view until the desired order is achieved.