Sustainability
@ Royal Society Chemistry
4. Managing your Content
Sustainability holds its information under a bespoke crafted system done with WordPress. Every page in WordPress is a post, and that is why we will be talking about post types.
4.1 How your information is stored
For WordPress, news articles and resources are all posts, but when you access your WordPress admin panel you will see news articles under the tab Posts and resources as Resources. You can get a better view from outside learning about the blueprints of the posts and pages from the WordPress official documentation here. When I say that both of them are posts I mean they are all posts but with different Post types and taxonomies.
Post types are the way to differentiate content types in WordPress. For instance, pages and navigation menus are both post types however, they are made to serve different purpose.
Taxonomy is used to group post and custom post types together. The default WordPress taxonomy are categories and tags. WordPress allows you to create custom taxonomy to sort and group your content.
4.1.1 Post types and taxonomies
Post types are the way to differentiate content types in WordPress. For instance, pages and navigation menus are both post types however, they are made to serve different purpose.
Taxonomy is used to group post and custom post types together. The default WordPress taxonomy are categories and tags. WordPress allows you to create custom taxonomy to sort and group your content.
Learn more official information about taxonomies here.
After those definitions, If you think about post types in the way to dictate which way the post is going to behave, you can then create a post with dates functionality therefore it would look more like an event. Or adding a post basic information with an embedded file content or a link, then it would be a Resource or a News article.
Taxonomy, as explained above is used to filter and categorise the posts within a post type, by default WordPress will display the posts on descending order of when those posts were created showing the most recent ones first.
4.2 Create, edit and delete all Types
Once you click on one of the tabs mentioned above in this section, a list will appear in the WordPress Administrator page. On this list view we can click on add new to create a new post (located on the top of the window outside the list) , edit under each individual one to edit the post or trash in order to move it to the bin. (see example image below)

4.2.1 Default information and Screen Options
When you find yourself in the previous list of items, no matter if they are posts, pages, a custom post type, comments or else. You will see some default information and also have the option to configure the screen options (up in the top right corner of the screen, below your name that you signed in with.
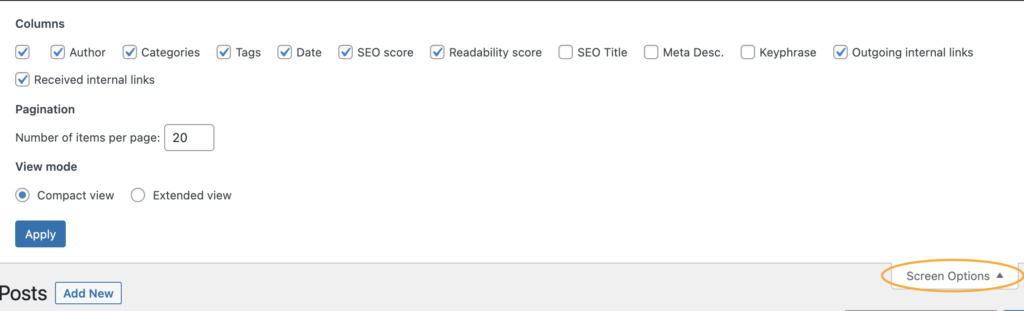
As you can see on the example image above, if you click on Screen Options, a new are will be discovered on the top of the screen. This toggle will allow you to select the default information that will be displayed or not in the list.
By default, the author of the post, the category, tags, date of creation and two readings from the Yoast SEO Plugin will be showing (SEO score and Readability Score), but as you can see on the image above, you can hide them and turn on others.
4.2.2 Quick action, Bulk editing and Bin
Whether you go to Posts (News), Resources, or pages; you will encounter a similar WordPress list of all the items under those post types. Once you find yourself in one of those lists, you will be able to manage the posts and edit them as a bulk or even perform quick actions to them without the need to open the page editor individually for each post.
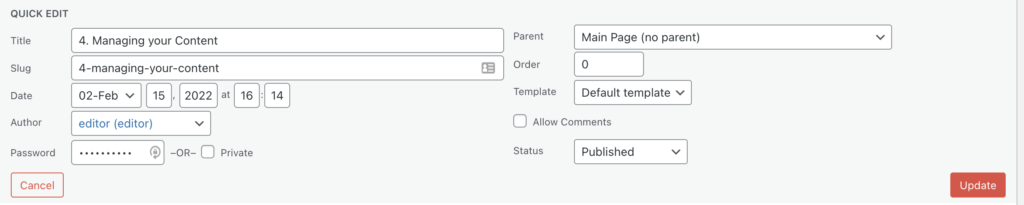
Quick Actions, allow you to perform several actions to a page without having to open the page editor. You can: Change the title and slug; the date of release, the author, put a password so the post is protected, define a parent or an order for the page, change the template that the page is using (for more information about templates, go to section 9. What else can you do?)
Bulk editing, as its name indicates allows you to perform actions in bulk to the selected pages, you can select them by clicking the squares before the title of the post. These actions being edit and move to trash).
Bin, it’s an actual bin, but in WordPress is very useful as you can perfectly move all pages that are not ready or you meant to use in the future, and later on go to your bin and restore them in order to continue editing. In order to truly delete a post or page you would have to delete it again from inside the bin.
4.3 Featured image
4.3.1 Description
A featured image represents the contents, mood, or theme of a post or page. Posts and pages can have a single featured image, which many themes and tools can use to enhance the presentation of your site.
E.g your featured image may be presented as a banner at the top of the page or post, displayed as the thumbnail image when the link is shared on social media, or displayed in a blog feed on your homepage.
4.3.2 Uploading a Featured Image
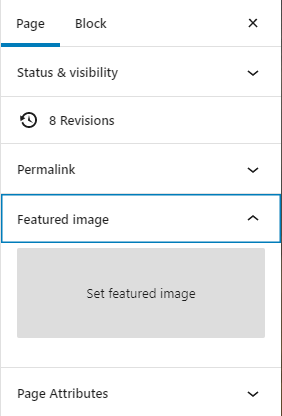
- Locate the Featured Image drop down, under the Page tab, in the right hand sidebar.
- Click the small arrow on the right hand side to expand this section.
- Click the grey tile titled Set Featured Image.
- Upload a new image or select an existing image from your Media Library.
Changing image sizes to save bandwidth
Important Reminder:
Ensure that the images you upload to the site are:
- Resized (the correct dimensions – Recommended maximum size of 2500px on the tallest side and less than 72 ~ 150dpi (density of pixel per inch).
- Compressed (smallest file size, to keep page load time down)
- Titled with SEO in mind (you can edit the title in the Media Library. Keep your keywords in mind)
- Given ALT attributes (ALT tags explains the contents of the image to Bots. You can edit Alt tags in the Media Library. Keep your keywords in mind)
4.4 Taxonomy Selection – Categories & Tags
Taxonomy selection can help us differentiate the different posts or post types we create.
4.4.1 Taxonomies
By default we have both Categories and Tags as Taxonomy selection. If you have a website that creates content about the latest trends in tech, you might want to consider creating different categories such as: PC, Peripherals, Upgrades, Entertainment, Productivity and else. Inside each category you could then even filter them by the manufacturers brand with tags. So when someone in the audience is interested in knowing the latest peripherals by a specific brand he can just choose one category and tag and all the related posts will be displayed for that person.
4.4.2 Categories
With WordPress you can create your own tags. By default you will only have the uncategorised category but creating your own ones is quite easy. I will guide you through it.
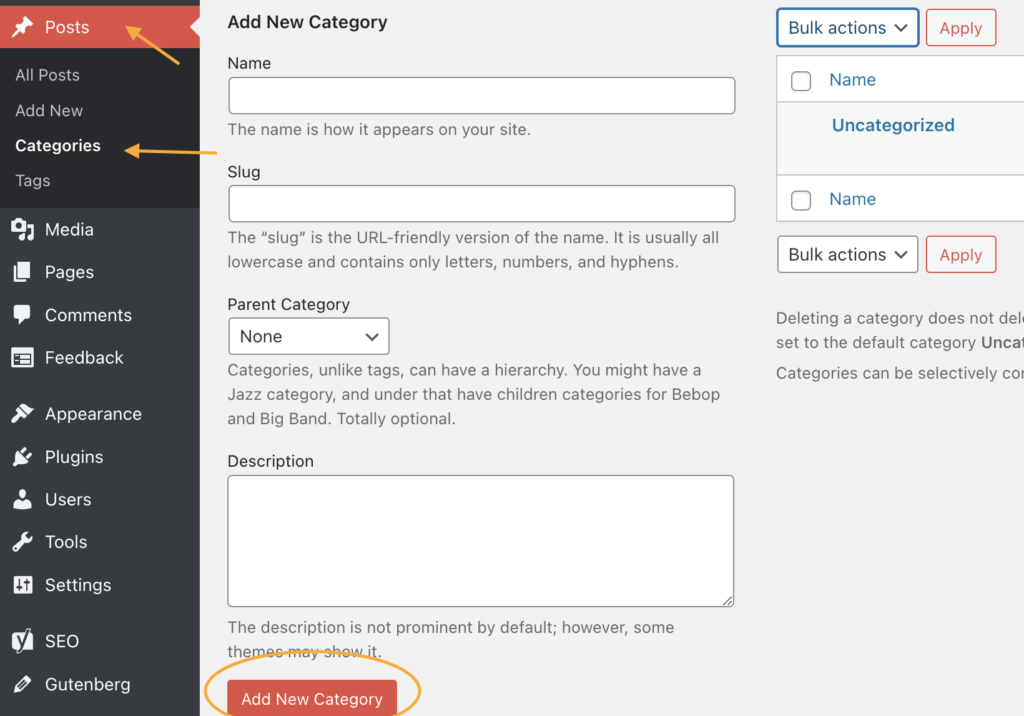
As you can see on the example image above. In order to access this menu we can go to Posts, and within the dropdown that appears on the left sidebar, we can select Categories, this menu window will appear. For creating a new Category, you must introduce its name, slug and description. If you just want to have one level of hierarchy on your categories do not choose a Parent Category, but if, on the other hand you want to have subcategories for the sake of organising or conveying meaning, you can group them under the same parent making them children of said parent. Finally click on Add New Category and it will be created.
4.4.3 Tags
Managing and creating tags is very similar to categories with the exception that you cannot create hierarchy between tags, on the other hand you can select as many tags as you want.
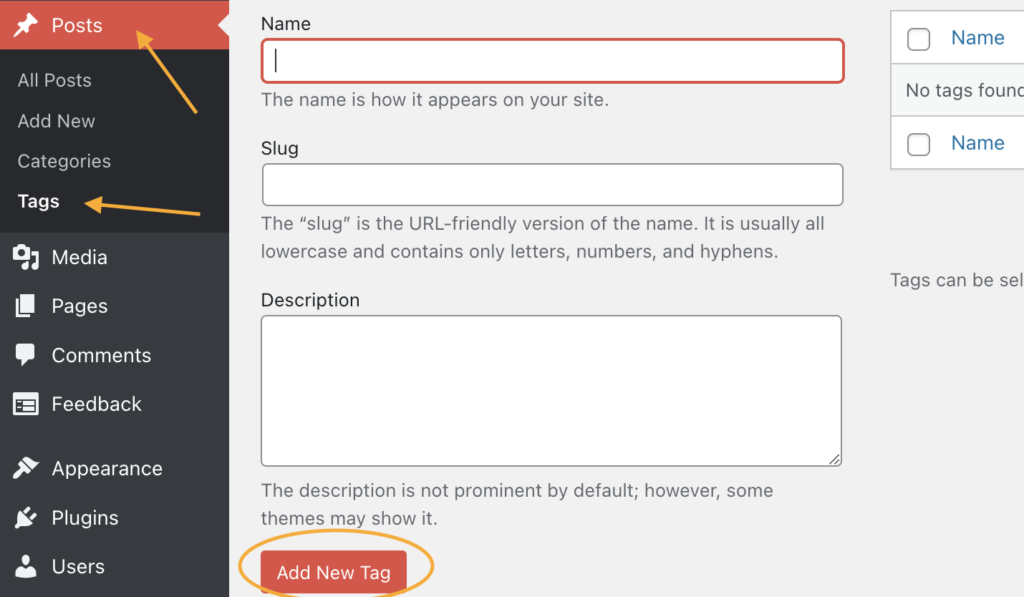
Accessing this menu is very similar to accessing the Categories menu, we will click on Posts or you own post type, and on the dropdown we have to select Tags. There are no tags by default but creating one is a matter of introducing name, slug and description. Finally click on Add New Tag and it will be created.
To learn more about Taxonomies, check WordPress Documentation here.
4.5 Managing Bespoke Content
We have dedicated a whole section for bespoke content in section 7. Managing maps, visualisations, news and resources.
4.5.1 Linking to the sections
You will find how to link through section on section 7.
4.6 SEO (Search Engine Optimization) – Yoast SEO Premium
Increase your reader’s engagement and ensure your article is optimised for Google by following Yoast’s SEO checklist.
It’s important to fill Yoast out first so you keep SEO in mind while writing your content and you can refer back to the checklist at the bottom of the page as you go.
4.6.1 How to fill out the Yoast Premium SEO checklist
- Enter your page/article/event focus keyword and supporting keywords (these are the terms you want the page to rank for)
- Edit the SEO title (this is the blue page title that will show in Google search results)
- Edit the Meta Description (this is the short description located under the SEO title in Google’s search results)
- Review the traffic light system & aim for a green score
- Yoast will bring back a colour coded traffic light system to show you the areas that are well optimised, suggestions for improvement and areas that need attention.
4.7 Reviewing, Drafting, Scheduling & Publishing
Before your page or post is ready to publish, head down to the bottom of the page and review the Yoast SEO Checklist to ensure all best practices are in place.
Then, head over to the Settings Toolbar on the right hand side and ensure the following are correct:
- Permalink (the URL – usually the page title. Ensure your focus keyword is included)
- Featured Image
- Category & tags
4.7.1 How to save as draft:
To save your page or post as you’re working, to save a draft version to come back to later or for a moderator to review, follow the step below:
Simply click the Save Draft button (blue text) in the top right of the WordPress toolbar.
(See example image below)

The Preview button (blue text) lets you view your page or post on the site, so you can see how it will appear to visitors on Desktop or mobile devices.
4.7.2 How to use the schedule feature:
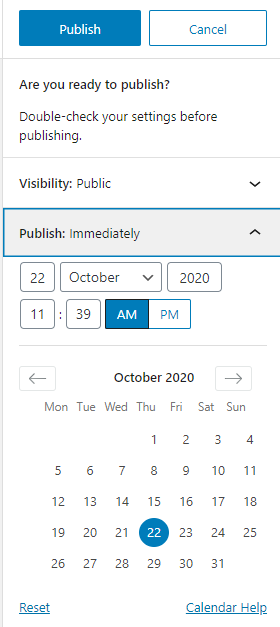
- Click on the blue Publish button at the
Top right hand corner of the page (example image on the left side). - Set the Visibility setting (leave this as public so it is visible to everyone. You may want to set a post or page to Private is you are creating an upcoming event and want to see the live page on the site, without users being able to find it, then save it as public when you are ready).
- Select the Publish time by clicking the drop down menu and entering the specific date and time.
4.7.3 How to publish immediately:
- Click the blue Publish button at the
Top right hand corner of the page. - Set the Visibility setting.
- Click the blue Publish button again to instantly publish to the site.
4.7.4 Password protecting a page.
If you want to protect a specific page with a password in order to give specific access to it. WordPress allows us to do so very easily. We would need to follow the following example image as a guide.
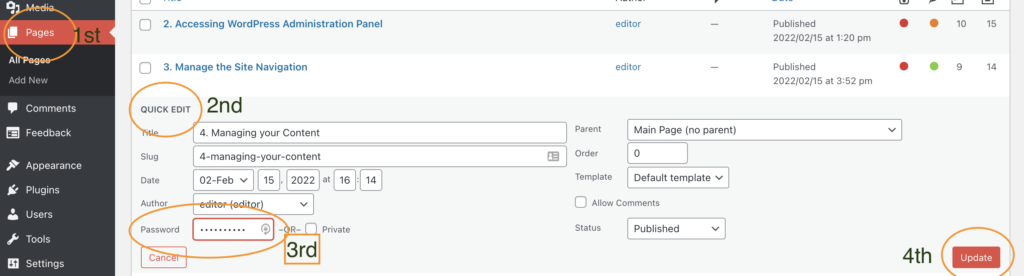
In order to do so, you will have to follow the following steps:
- On your WordPress Administrator sidebar, go to Pages.
- You will find a list of all the different pages you have on your website, choose the one you want to protect with a password and chick on quick edit.
- The menu that appears on the example image will appear, now you have to go to password and type in your selected password. Take a note of this and only share with people that are meant to have access to this page.
- Finally Click on Update and the page will be password protected.
- You can check the results by clicking on view that page and introducing the password you chose. If you have made a mistake, you can change the password in the menu where you first chose your password.